Installation
Finance BI, offers its users the ability to adopt financial analysis solutions, enabling quick and efficient evaluation of financial ratios, annual accounts, and portfolio forecasts.
The purpose of this guide is to assist with the installation and configuration starting from an operational Dynamics Business Central environment.
1. Installation and Connector Setup
First, download the Aitana Dashboards Connector for Power BI from AppSource using the following link.
![]()
After that, activate the trial period of the application once downloaded.
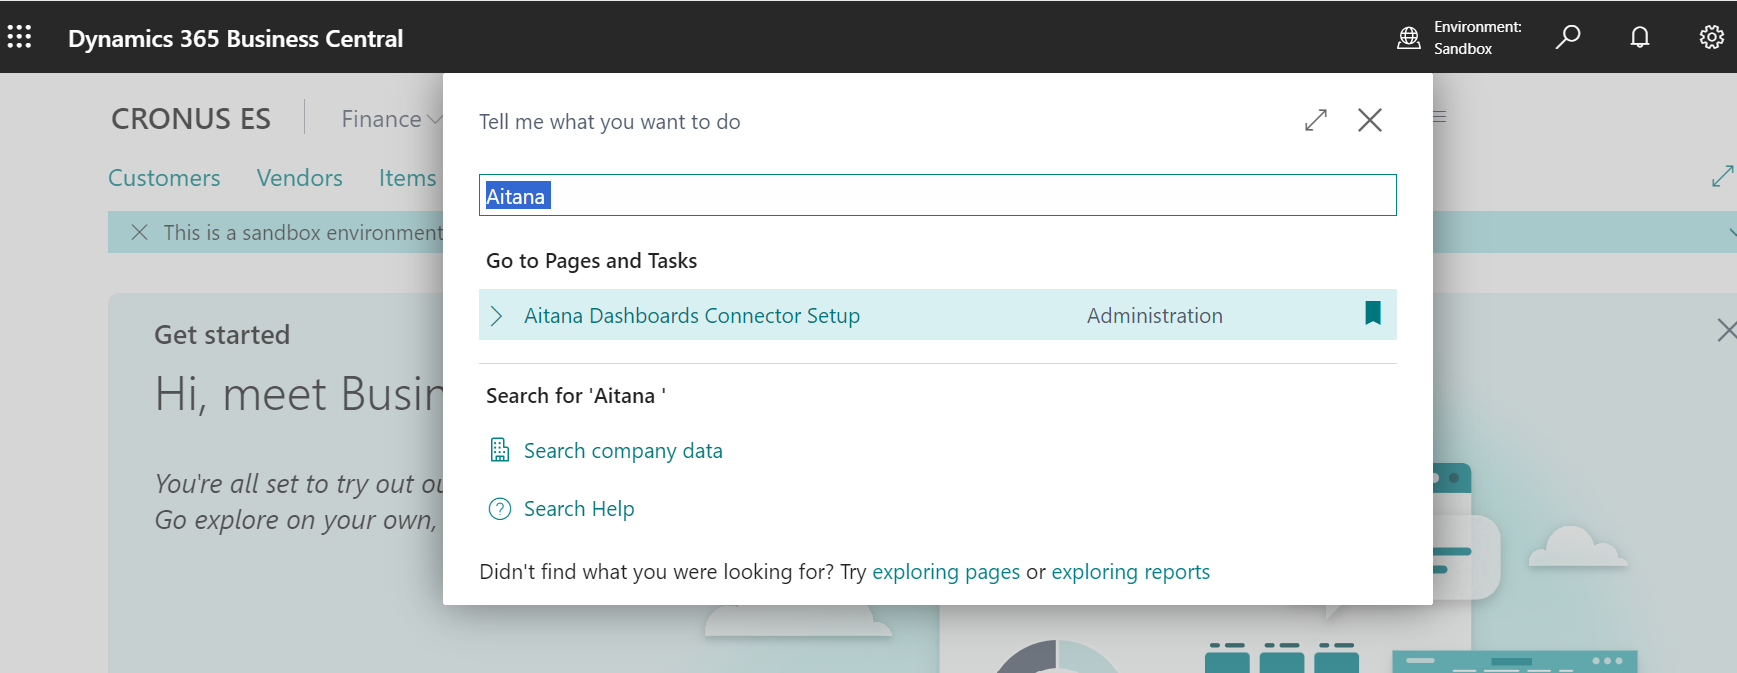
Next, you need to proceed with the configuration of the connector. To do this, go to the Aitana Dashboards Connector Setup page. You can find it directly through the Business Central search bar, as shown in the image below. Additionally, you may want to bookmark this page for quick access from your homepage.
Once there, under General Configuration, you will find the option to Enable/Disable PWBI Connector.
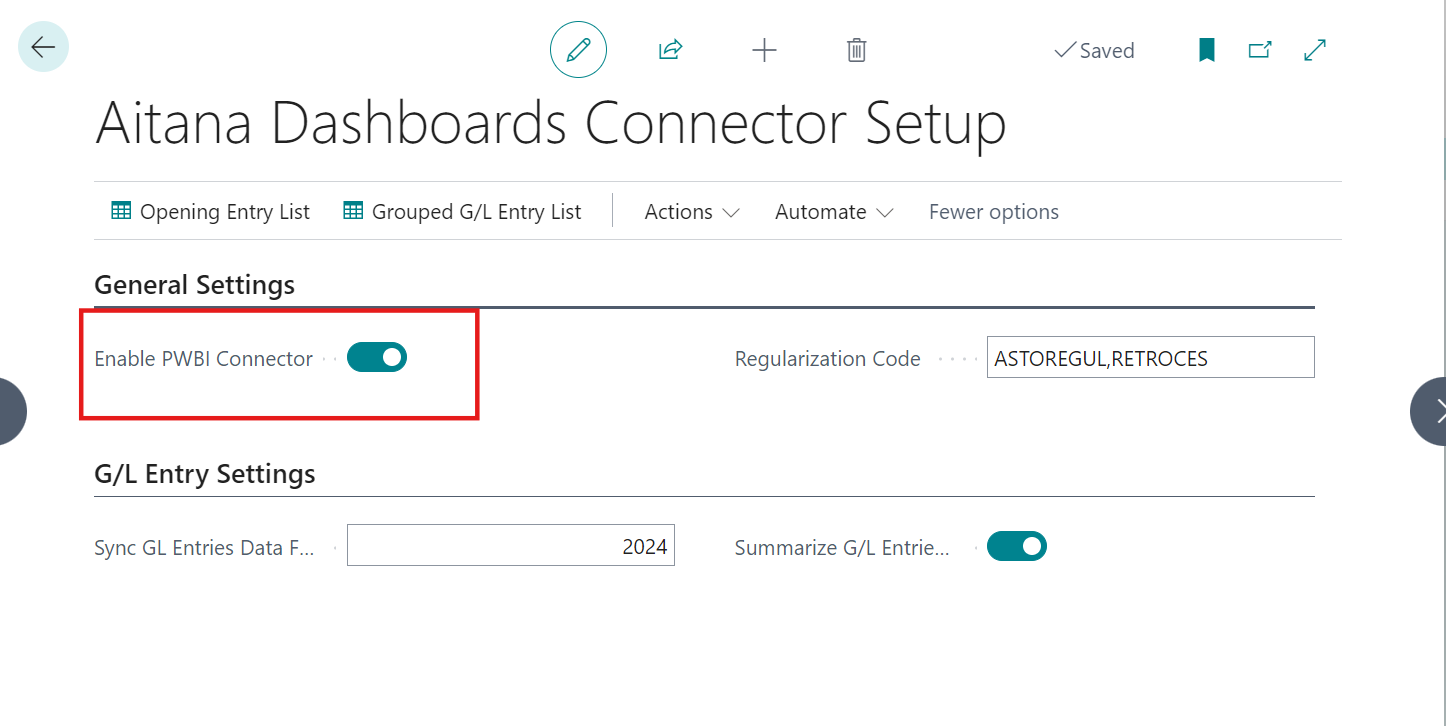
Enabling this option allows data synchronization for each of your companies. In other words, if you enable this option, the data from the company selected in your current environment will sync with Power BI.
This option must be configured individually for each company.
Additionally, another button labeled Enable AI Visuals is available. When activated, it automatically enables visuals powered by artificial intelligence, allowing users to analyze predictions, detect anomalies in their data, and access other advanced functionalities.
Under the G/L Entry Settings section, there are three additional settings to configure.

First, you need to specify the year from which accounting entries will start synchronizing, as it’s recommended to set a starting point. Opening entries and prior summaries will also be loaded for each account, source, and dimension. In fact, if you look at the image above, you'll see the Opening Entries at the top, along with the Grouped G/L Entry List, which will be discussed in more detail later.
Continuing in this section, there is also the option to enable or disable Summarize G/L Entries By Month. By enabling this option, you can summarize G/L entries by month, optimizing synchronization for companies with large data volumes. Once enabled, these summarized entries will be generated periodically and can be found in the Grouped G/L Entry List, located at the top of the page.
Keep in mind that enabling this option will prevent you from accessing the detailed records in your analytics solution. Therefore, it’s only recommended to enable this option when optimizing bandwidth or data synchronization.
Additionally, you'll also see the Regularization Code field, which contains a list of codes used for regularization entries, separated by commas. In this case, you will see the codes ASTOREGUL and RETROCES, which are used to identify exclusive entries. Therefore, it is recommended to keep these default values.
The configuration set in the G/L Entry Settings section applies to all companies in your Business Central environment.
At the top of the configuration page, you’ll see two lists: Opening Entry List and Grouped G/L Entry List. These lists allow you to review or manually adjust the entries if necessary.

It is important to highlight that the current connector includes the Variable Balances functionality, allowing a single accounting account to appear under either the assets or liabilities section depending on its balance.
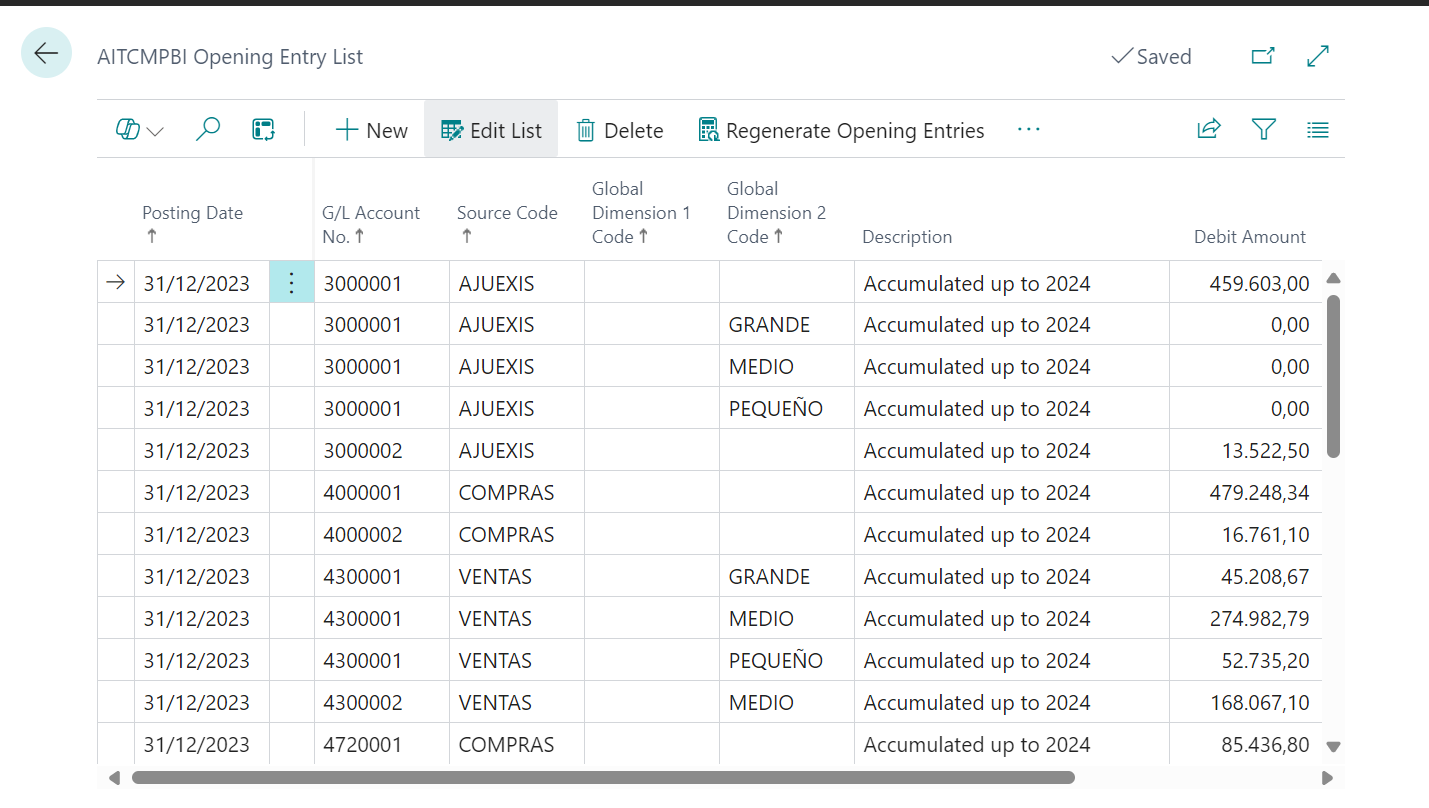
In the Opening Entry List, summarized opening entries are generated for data prior to the selected year of synchronization, loading a summary of amounts for each account, source, and dimension to avoid loading all entries. For example, if you set the synchronization year to 2024, the opening entries list will store all records under the date 12/31/2023.
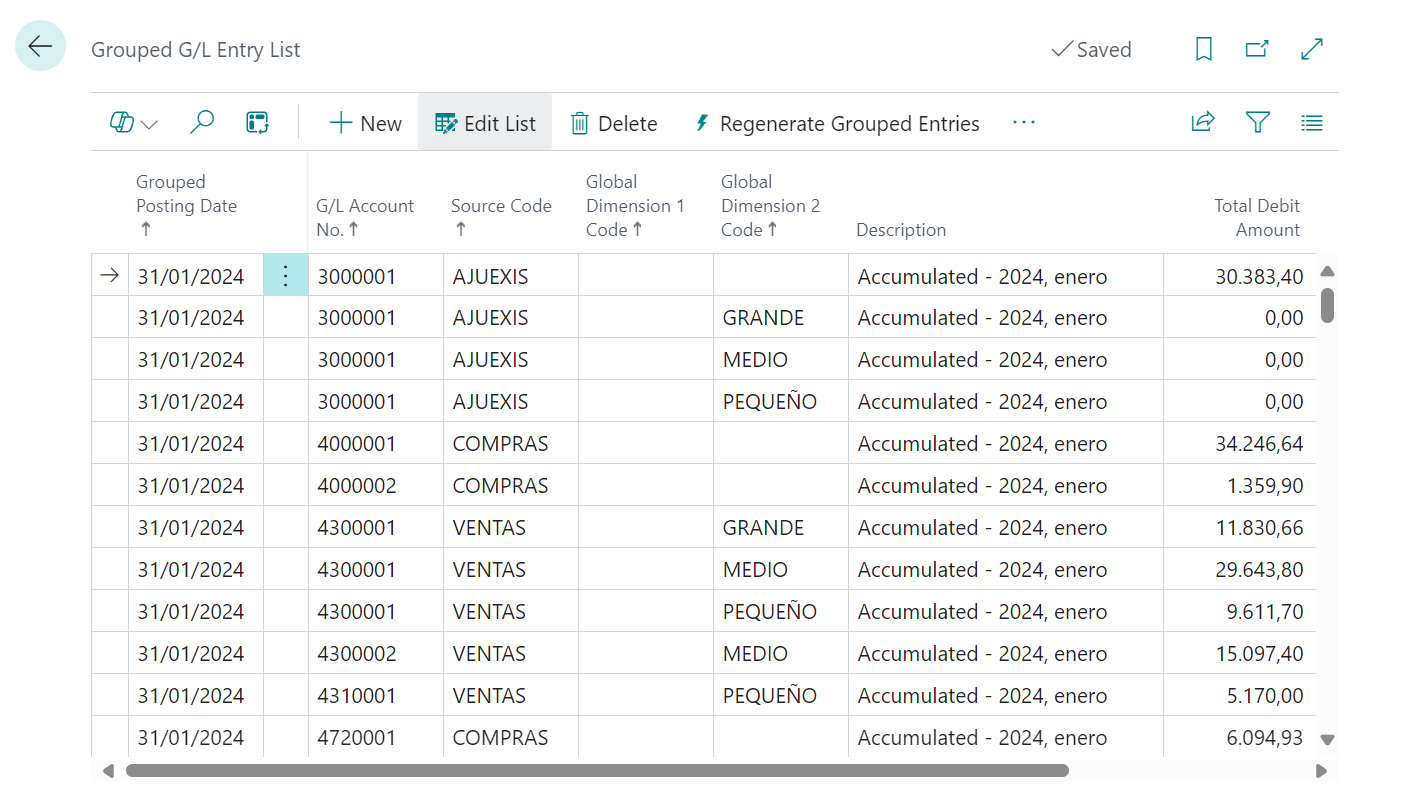
Finally, in the Grouped G/L Entry List, you will find the monthly summarized entries. These will be generated after enabling the option in the G/L Entry Settings section.
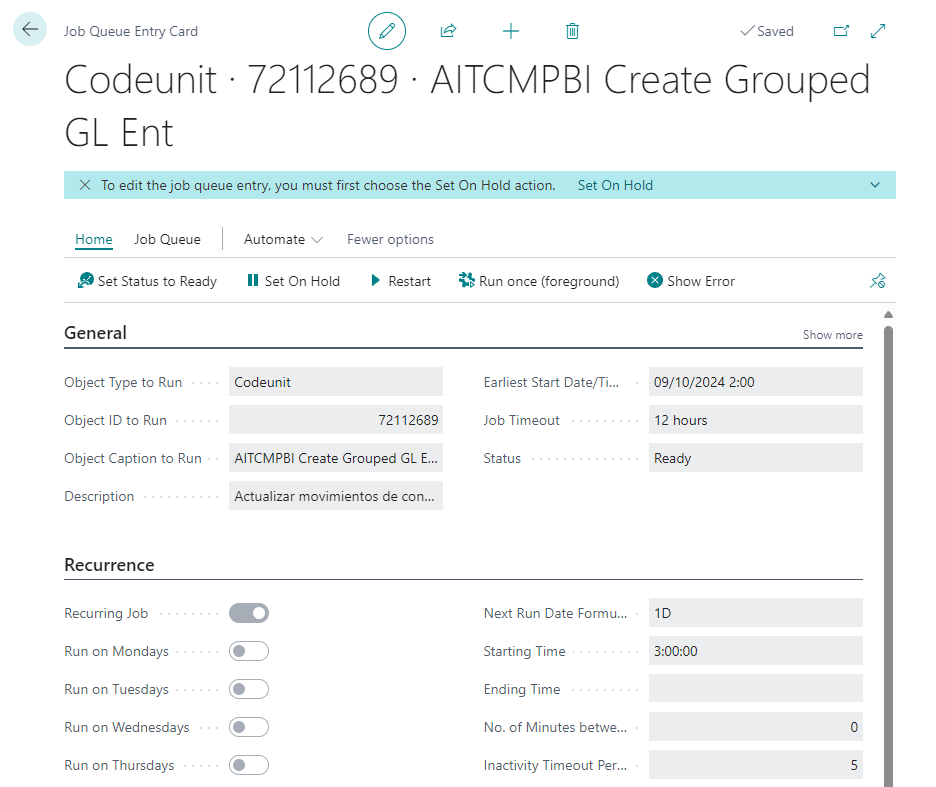
After installing the extension, a job queue entry is created to update these summarized entries, scheduled by default to run at 3 a.m. If you want to access this page to configure it to your liking, navigate to Job Queue Entries in your Business Central. There, you’ll find various scheduled tasks, including one named AITCMPBI Create Grouped GL Ent, identified by code 72112689.
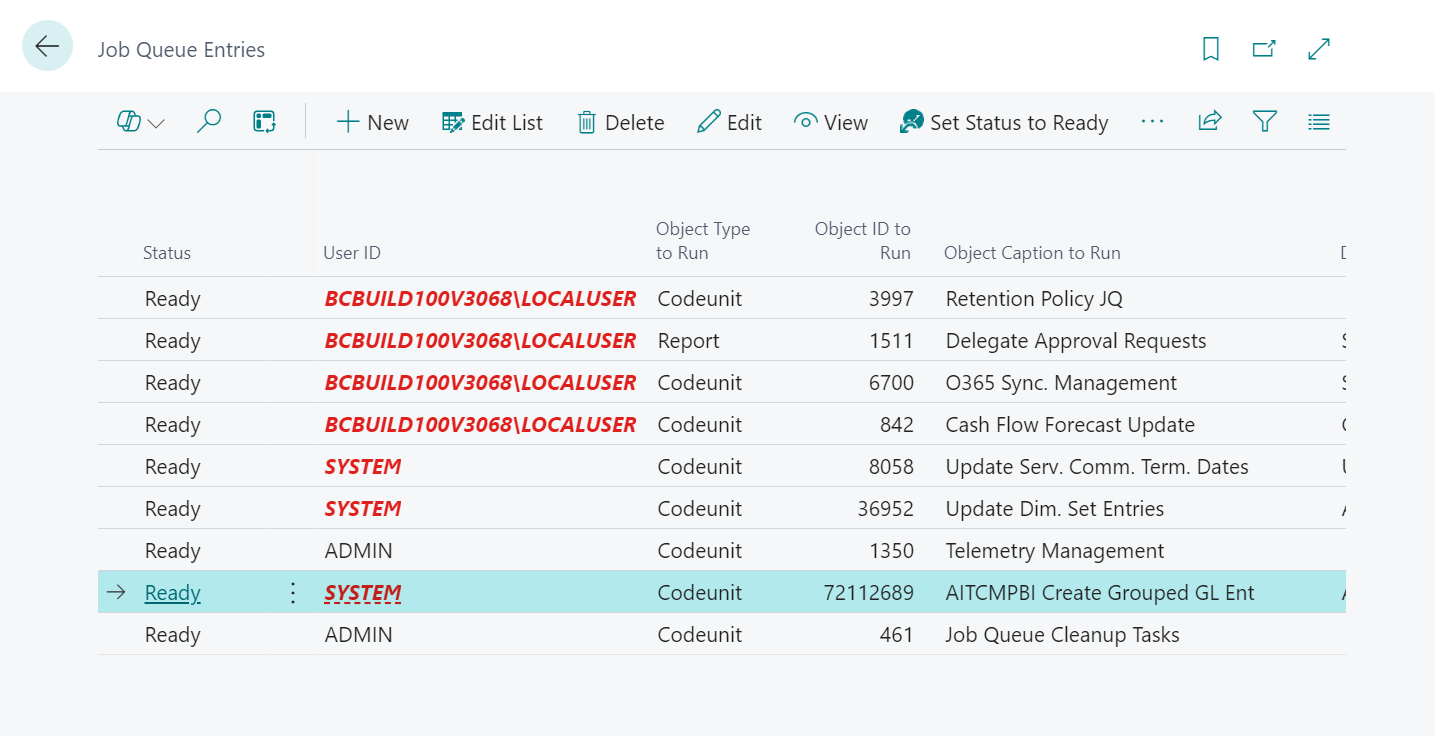
Clicking on it will display all the details of the update process.
2. Installation and Configuration Setup
Similar to the connector, open the Finance BI application on AppSource, click Get it now, and proceed with the installation.
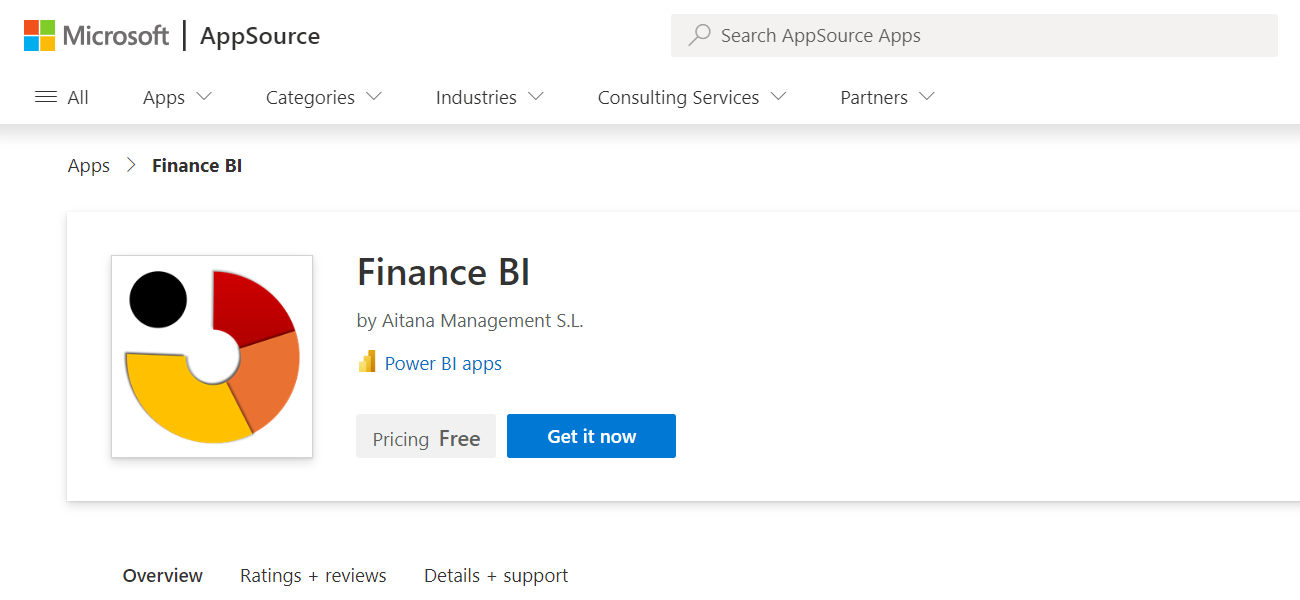
Once installed, the application will be available within the apps section and will also appear as a new workspace in your Power BI service.
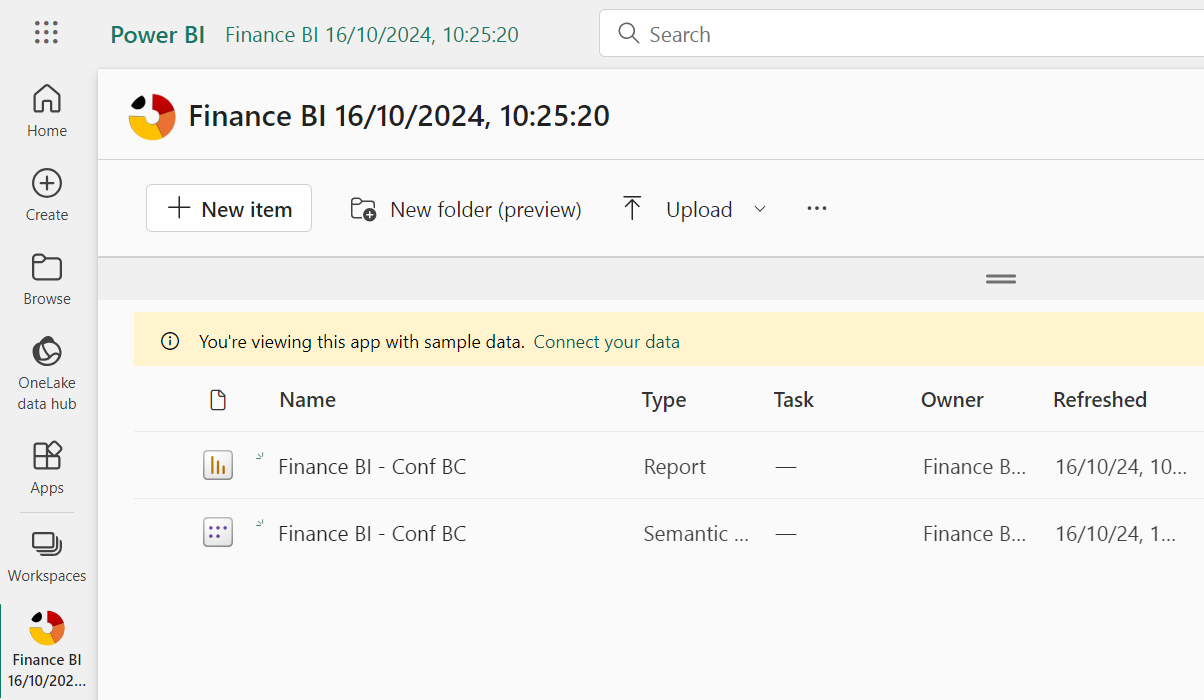
At this point, it’s time to connect to your data. When you first open the Power BI app in the service, you will see the following message: You are viewing this app with sample data. Connect your data.
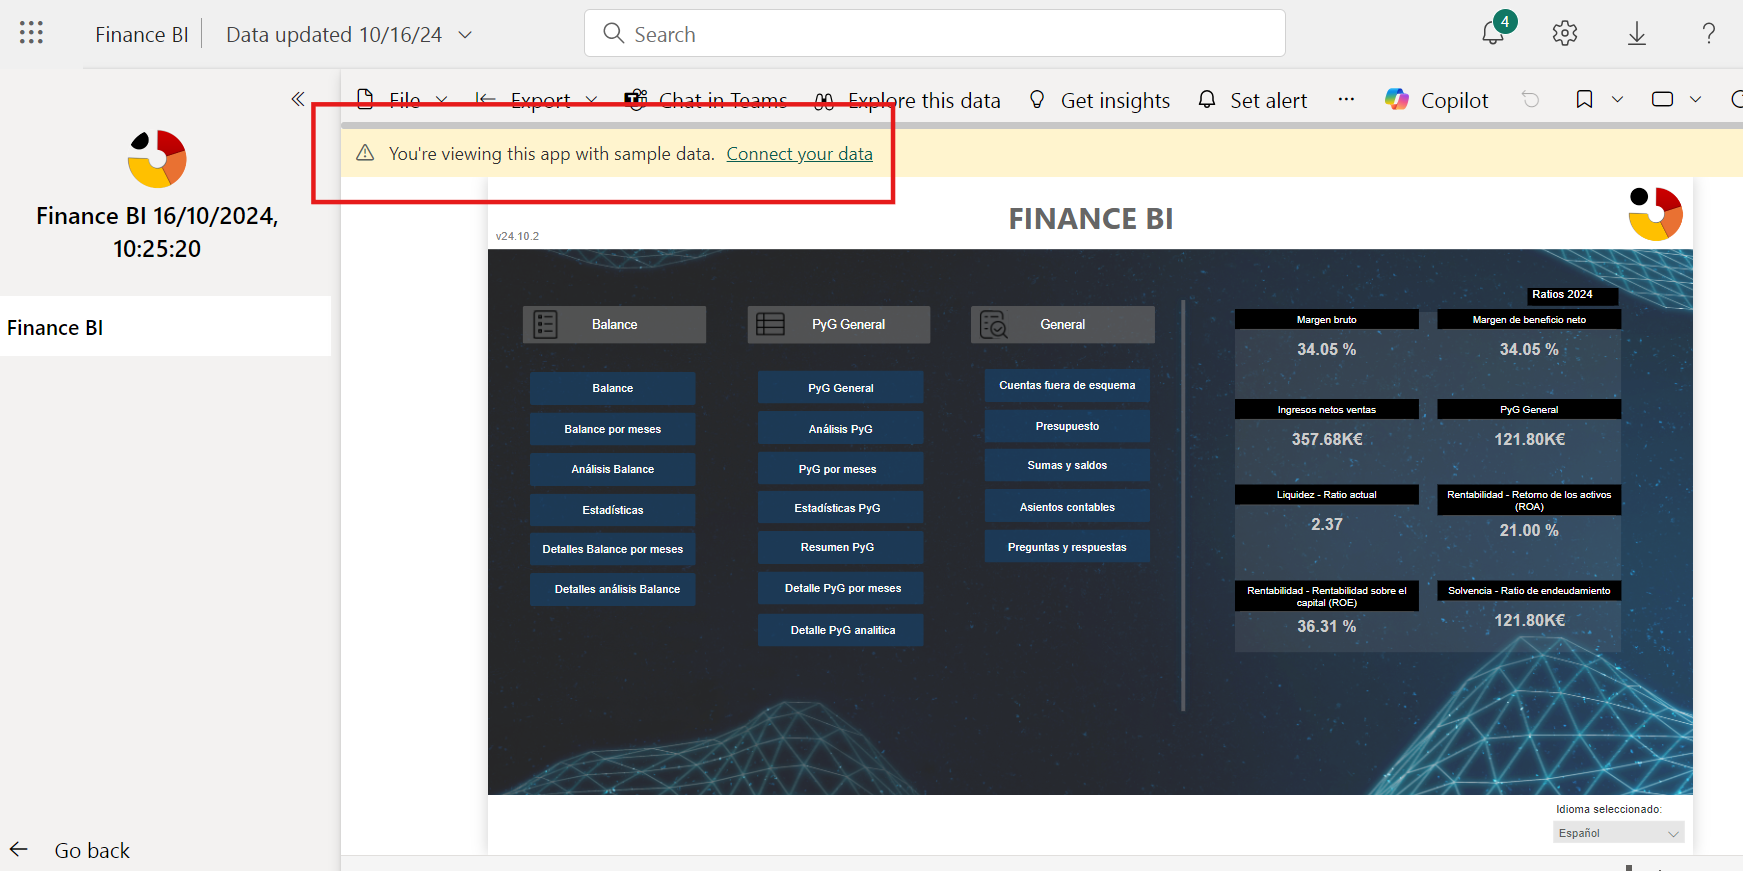
Once you click this message, a new window will appear, allowing you to configure the connection to your Business Central environment. Here, you will need to specify the required parameters, which in this case is only the Environment.

Be sure to enter this parameter in uppercase letters.
Finally, connect using the OAuth2 authentication method. It’s important to set the privacy level to Organizational. From this point on, the dashboard will display your data.
3. Loading the P&L Statement and Balance Sheet Scheme
When the connector is first installed, both the Balance Sheet and Income Statement schemes will be automatically loaded into Business Central. These templates will be used in the financial dashboard. To access them, simply log in to your Business Central account and search for "(Financial Report) Row Definitions", or you can also click on Account Schedule Names, as shown in the following image.

Once inside, you will find both schemes: AIT_CMFBS (Balance Sheet scheme) and AIT_CMFPYG (Income Statement scheme). As a user, you have the option to "modify" certain aspects of these templates to better suit your needs.
To do this, simply select the desired template, click on Actions - Other - Edit Row Definition.

After selecting, you can add the necessary accounts to either of the two schemes.
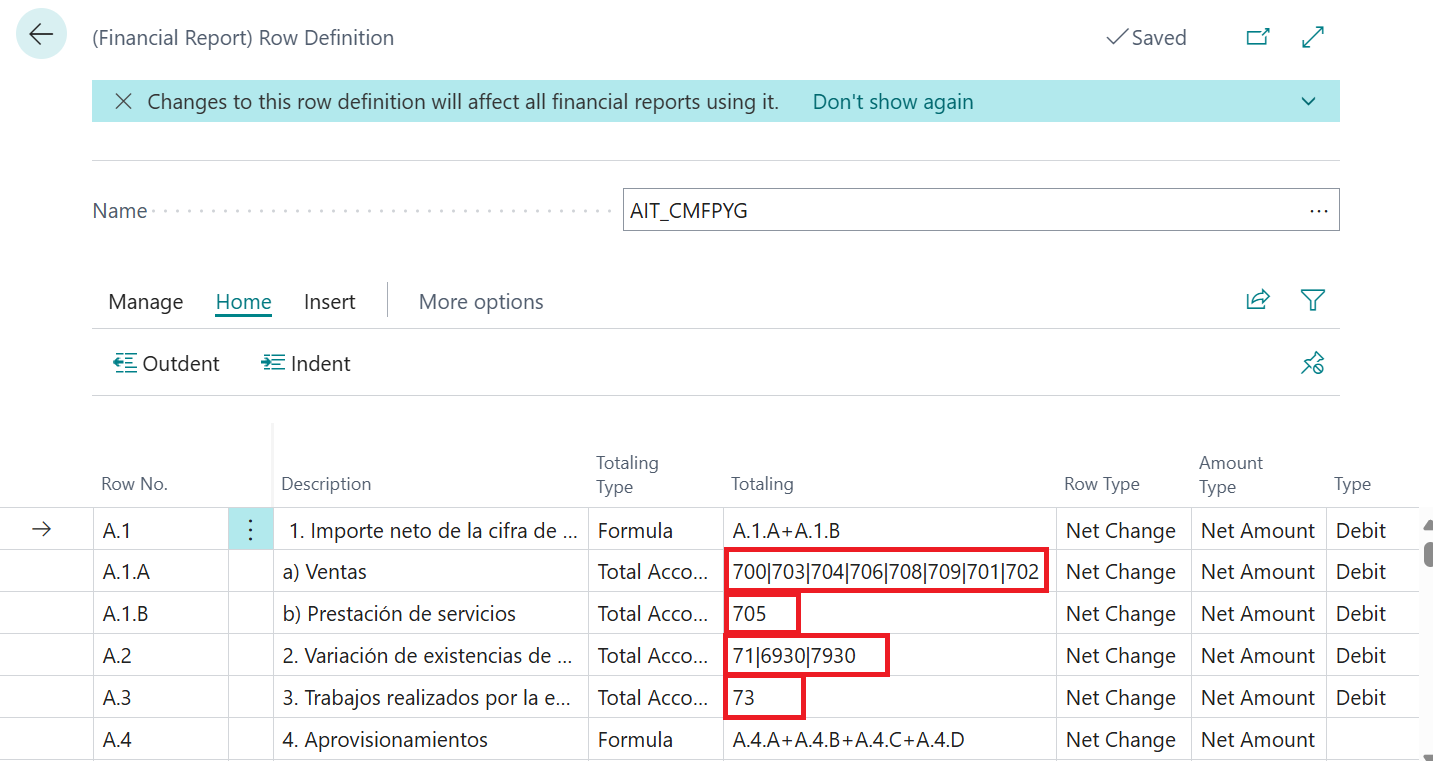
As a customer, you can add accounts to both schemes from Business Central, but you cannot modify levels or sections. If you need customization for any of the scheme or a modification of the levels, please do not hesitate to contact us.
Additionally, within the (Financial Report) Row Definition page, you can regenerate the Account Schedules. This will delete the existing schemes and regenerate the initially loaded ones. This option is available by clicking on Actions - PWBI Connect Aitana - Regenerate Account Schedules.

Please note that if you have added accounts to any of the templates and decide to regenerate them, this action will result in the loss of the accounts you added, as the regenerated schemes will retain the same structure as the originals.
4. Data Refresh
By default, datasets are updated daily at midnight, but you can also set specific times for your data updates.
First, go to the workspace where your application is located. Once there, click on the ··· of the Semantic Model to access the settings.

Now, go to the Refresh section and enable the Refresh Schedule option. In the Time section, you can add up to 8 different times within the same day (Power BI Pro license), allowing up to 8 daily updates.

Additionally, you can add specific email addresses to receive notifications of update errors.
Finally, click on Apply to save these changes.
To update the data manually at a specific time, simply go to the Power BI workspace where the application is located and select the Refresh Now option available for the semantic model.

After attempting a refresh, you may encounter errors that prevent the process from completing. For more details on these errors, visit the following page.
5. Sharing the Finance BI Application
There are two options for sharing Power BI reports:
- Sharing via the Power BI app
- Sharing the Power BI workspace
The first method offers multiple advantages over the second, including more intuitive access, better security controls, and improved version management. If you choose the second method, ensure careful and proper management of user permissions to maintain data integrity and security.
In this case, we will focus on the first option: sharing through the Power BI app.
Sharing through the Power BI App
This way, users can access the dashboard directly from the Power BI apps menu.
- Start by logging into Power BI, then open the appropriate workspace containing the Finance BI app.
- Select Update app

- Click the Permissions tab to grant users access to the app.
- Agree to install the app automatically.
- Click Update app.
